
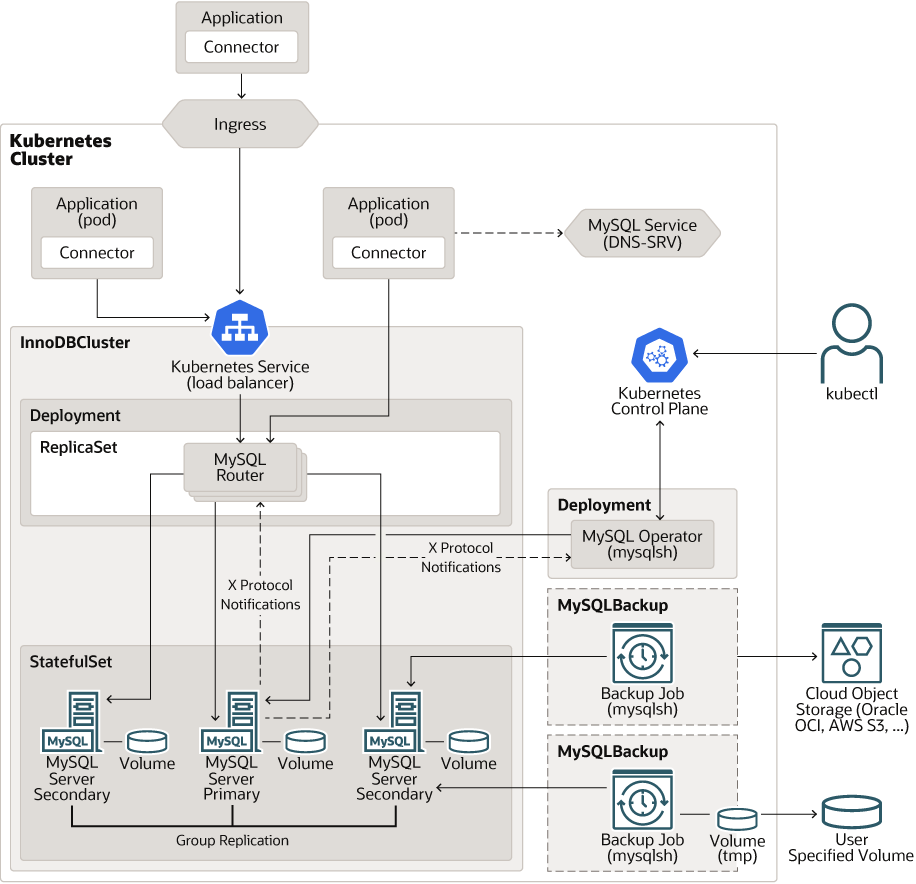
innodb cluster on kubernetes 架构图
创建namespace和包含mysql root密码的secret
   kubectl create namespace test-mysql
   kubectl -n test-mysql create secret generic mysql-root-password \
        --from-literal=rootUser=root \
        --from-literal=rootHost=% \
        --from-literal=rootPassword="sakila"
建立innodb集群,包含mysql-export,注意mysqld-exporter:v0.19.0,有点问题,所以只能用v0.18
kubectl create -f innodb-cluster.yaml
cat innodb-cluster.yaml

apiVersion: mysql.oracle.com/v2
kind: InnoDBCluster
metadata:
  name: mysql-production
  namespace: test-mysql
spec:
  instances: 3                       # 锁死 3 副本 MGR 多数派集群
  version: "9.7.0"                   # 锁死最新 9.7.1 Innovation 版本
  secretName: mysql-root-password    # 引用包含 root 密码的 Secret

  # 【测试公共网关】自动拉起 2 个独立的、全自动读写分离的高可用 Router Pod
  router:
    instances: 2
    version: "9.7.0"
  tlsUseSelfSigned: true

  # 1. 内置 metrics exporter 核心配置
  metrics:
    enable: true                    # 开启exporter边车
    image: prom/mysqld-exporter:v0.18.0

  # 1. 【亲和性层级对齐】对齐官方 podSpec 路径,将 3 个 Pod 生存空间过滤在 164-167 范围内
  podSpec:
    affinity:
      nodeAffinity:
        requiredDuringSchedulingIgnoredDuringExecution:
          nodeSelectorTerms:
          - matchExpressions:
            - key: openebs-storage
              operator: In
              values:
              - "enabled"
    volumes:
      - name: mysql-sock
        emptyDir: {}
    containers:
      - name: mysql
        volumeMounts:
          - name: mysql-sock
            mountPath: /var/run/mysqld
      - name: metrics
        volumeMounts:
          - name: mysql-sock
            mountPath: /var/run/mysqld
  # 2. 存储对齐层:精准对接我们做好的 OpenEBS HostPath 数据库专属 SC
  datadirVolumeClaimTemplate:
    storageClassName: "openebs-hostpath-mysql-data2" # 🌟 注意:这里没有 Name 字样!
    accessModes:
      - ReadWriteOnce
    resources:
      requests:
        storage: 45Gi              # 账面写 45G(底层的 XFS 目录不卡上限)

  # 3. 【参数对照层】补回你全部原始参数意图、且通过 9.7.1 内核校验的 my.cnf
  mycnf: |
    [mysqld]
    # 1. 全局关闭MySQL服务SSL,客户端明文连接,节省CPU
    # skip-ssl

    # 2. MGR组复制内部明文通信,绕过 Kopf REQUIRED SSL 校验
    # loose-group_replication_ssl_mode = DISABLED
    # loose-group_replication_recovery_use_ssl = 0
    #tls_version = ""

    # === 补回并完整保留的你的核心存储/内存参数 ===
    innodb_data_file_path = ibdata1:128M:autoextend
    innodb_log_buffer_size = 64M
    innodb_redo_log_capacity = 1G
    innodb_file_per_table = on

    # === 严格遵从 9.7 官方 MGR 强制天条,全面封杀非事务引擎,包含 MyISAM ===
    disabled_storage_engines = "MyISAM,BLACKHOLE,FEDERATED,ARCHIVE,MEMORY"
    relay_log_purge = ON                   # 显式声明阅后即焚,死守 50G 物理盘

    # === MGR 基础死锁与高可用对齐 ===
    gtid_mode = ON
    enforce_gtid_consistency = ON
    lower_case_table_names = 1             # 锁死大小写不敏感
    default_table_encryption = OFF

    # === 并行复制进阶优化(9.7.1 自动走高级 WRITESET 逻辑时钟回放) ===
    replica_parallel_workers = 8
    replica_preserve_commit_order = ON
    xa_detach_on_prepare = ON

    # === 你的日志、审计与高并发资源调优补齐 ===
    slow_query_log = ON
    long_query_time = 1
    log_output = FILE
    log_timestamps = system                # 强制日志使用虚拟机系统当地时间
    general_log = off
    max_binlog_size = 256M
    binlog_expire_logs_seconds = 604800    # binlog 自动保留 7 天
    binlog_rows_query_log_events = on      # 开启审计与闪回:在 binlog 中完整记录原始 SQL 语句
    max_allowed_packet = 128M              # 允许 128M 大字段传输
    innodb_lock_wait_timeout = 50          # 死锁等待超时 50 秒

    # === 内存与缓冲大幅扩容 ===
    innodb_buffer_pool_size = 4000M         # 充分利用独占的 8G 硬件内存
    innodb_buffer_pool_instances = 4        # 消除单缓冲池的高并发锁竞争

    # === 金融级“双1”数据零丢失绝对死锁 ===
    innodb_flush_log_at_trx_commit = 1
    sync_binlog = 1
    transaction_isolation = READ-COMMITTED
    bind-address = 0.0.0.0
    max_connect_errors = 9999999
    max_connections = 2000
    open_files_limit = 65535
查看状态
# kubectl -n test-mysql get pod
NAME                                       READY   STATUS    RESTARTS   AGE
mysql-production-0                         3/3     Running   0          130m
mysql-production-1                         3/3     Running   0          131m
mysql-production-2                         3/3     Running   0          133m
mysql-production-router-6f47f64d58-5c8jh   1/1     Running   0          3h11m
mysql-production-router-6f47f64d58-tx8sp   1/1     Running   0          3h11m

# kubectl -n mysql-operator get pod
NAME                              READY   STATUS    RESTARTS   AGE
mysql-operator-68c65b6969-ps72p   1/1     Running   0          5d21h
测试mysqld-export是否生效
# curl http://10.110.39.185:9104/metrics
# HELP go_gc_duration_seconds A summary of the wall-time pause (stop-the-world) duration in garbage collection cycles.
# TYPE go_gc_duration_seconds summary
go_gc_duration_seconds{quantile="0"} 3.5868e-05
go_gc_duration_seconds{quantile="0.25"} 5.0305e-05
go_gc_duration_seconds{quantile="0.5"} 6.0143e-05
go_gc_duration_seconds{quantile="0.75"} 7.8717e-05
go_gc_duration_seconds{quantile="1"} 0.000272952
go_gc_duration_seconds_sum 0.004958051
go_gc_duration_seconds_count 67
建立servicemonitor
cat innodb-sm.yaml
apiVersion: monitoring.coreos.com/v1
kind: ServiceMonitor
metadata:
  name: mysql-production-sm
  namespace: test-mysql
  labels:
    prometheus: main
spec:
  selector:
    matchLabels:
      mysql.oracle.com/cluster: mysql-production
      mysql.oracle.com/instance-type: group-member
  endpoints:
  - port: metrics
    path: /metrics
    scheme: http
    interval: 15s
    scrapeTimeout: 10s

# kubectl create -f innodb-sm.yaml
确认service是否和servicemonitor labels匹配
 kubectl get svc -n test-mysql -l mysql.oracle.com/cluster=mysql-production,mysql.oracle.com/instance-type=group-member
NAME                         TYPE        CLUSTER-IP   EXTERNAL-IP   PORT(S)                                 AGE
mysql-production-instances   ClusterIP   None
<none>        3306/TCP,33060/TCP,33061/TCP,9104/TCP   3h46m
验证是否3个target
# kubectl port-forward -n monitoring svc/prometheus-k8s 9090:9090 &

# Forwarding from 127.0.0.1:9090 -> 9090

# curl -s http://127.0.0.1:9090/api/v1/targets | jq '.data.activeTargets[] | select(.discoveredLabels.__meta_kubernetes_service_name=="mysql-production-instances") | {instance: .labels.instance, health: .health, scrapeUrl: .scrapeUrl}'
Handling connection for 9090
{
  "instance": "10.110.39.204:9104",
  "health": "up",
  "scrapeUrl": "http://10.110.39.204:9104/metrics"
}
{
  "instance": "10.110.40.245:9104",
  "health": "up",
  "scrapeUrl": "http://10.110.40.245:9104/metrics"
}
{
  "instance": "10.110.38.59:9104",
  "health": "up",
  "scrapeUrl": "http://10.110.38.59:9104/metrics"
}
删除innodb集群
# 1. 强杀并拔掉 10 分钟旧集群的死锁保护
kubectl delete innodbcluster mysql-production -n test-mysql --force --grace-period=0
kubectl patch innodbcluster mysql-production -n test-mysql -p '{"metadata":{"finalizers":null}}' --type=merge

# 2. 强杀并拔掉 3 个错乱的旧 PVC 的保护锁(彻底擦成白纸)
kubectl delete pvc -n test-mysql --all --force --grace-period=0
for pvc in $(kubectl get pvc -n test-mysql -o jsonpath='{.items[*].metadata.name}'); do
  kubectl patch pvc $pvc -n test-mysql -p '{"metadata":{"finalizers":null}}' --type=merge
done

# 3. 按照上面去掉了 Name 的最新语法修改完后,重新一枪把配置砸进去!
kubectl create -f innodb-cluster.yaml
pod内存设置要求
innodb_buffer_pool_size ≤ Pod内存 × 0.65
保守安全底线:
Pod 内存 ≥ buffer_pool × 1.5
4G × 1.5 = 6G
也就是 limit 最低不能低于 6Gi,低于 6G 会出现内存紧张、OOM 风险。
更新my.cnf
修改部分参数不会自动更新和滚动pod,所以动态参数最好用SET GLOBAL 设置

#一键穿透 3 节点内存,原地秒级热激活 2M 排序与联表缓冲区性能
for i in 0 1 2; do
  echo "正在硬核激活 mysql-production-$i 的内存参数..."
  kubectl exec -it mysql-production-$i -n test-mysql -c mysql -- \
    mysql -uroot -p$(kubectl get secret mysql-root-password -n test-mysql -o jsonpath='{.data.rootPassword}' | base64 --decode) \
    -e "SET GLOBAL sort_buffer_size = 2097152; SET GLOBAL join_buffer_size = 2097152; SET GLOBAL read_rnd_buffer_size = 1048576;"
done
其他:mysql-operator强制要求mysql节点之间的数据复制走ssl协议,但是二进制部署的innodb集群没有这个限制
如果想不用ssl必须修改 Operator 源码,这个方式实际未测试 把硬编码 REQUIRED 改成 AUTO / DISABLED(你坚持 MGR 明文、零集群 SSL 开销) 日志里这段是官方 Operator 内置代码写死的,不能通过 CR 配置覆盖:
create_options = {
    "gtidSetIsComplete": True,
    "manualStartOnBoot": True,
    # 把 REQUIRED 改成 AUTO,才能才能搭配 tlsUseSelfSigned: false 禁用SSL
    "memberSslMode": "REQUIRED",  # 硬编码死值
    "exitStateAction": "ABORT_SERVER"
}
操作步骤:
拉取官方 mysql-operator 源码;
找到文件:mysqloperator/controller/innodbcluster/cluster_controller.py 389 行附近;
修改 “memberSslMode”: “REQUIRED” → “memberSslMode”: “AUTO”;
重新构建 Operator 镜像,替换集群里运行的 mysql-operator Deployment;
CR 里可保留 tlsUseSelfSigned: false,my.cnf 添加 loose-group_replication_ssl_mode = DISABLED
参考文档
官方安装文档:https://dev.mysql.com/doc/mysql-operator/en/mysql-operator-innodbcluster-common.html
参数表:https://dev.mysql.com/doc/mysql-operator/en/mysql-operator-properties.html#mysql-operator-spec-innodbcluster
关联参数
sort_buffer_size与 max_length_for_sort_data 存在微妙关联。在 9.x 时代,如果排序的数据行总长度小于该值,MySQL 会全自动采用最高效的“单路排序算法”在内存中一鼓作气搞定;如果超了,则退化为慢速的双路排序。
🔒 原创版权声明
本文标题:基于mysql operator在kubernetes上安装mysql innodb cluster 9.7.0
版权来源:Infraservicenow
⚠️ 重要声明:本站所有文章均为原创技术文档,未经作者书面正式授权,严禁任何形式转载、复制、摘抄、二次发布。
如需转载、引用、整理发布,请务必提前联系作者获得授权,违者将依法追究侵权责任。
© 2026 Infraservicenow All Rights Reserved. 保留所有权利。